
Boo-Boo Pouch Tutorial
Materials:

*Liquid Dish or Hand Soap
*Fabric (maybe 1/4 yd or so...scraps work fine)
*Two Plastic Ziploc Bags
*Scissors
*Pins
*Sewing Machine (or a love of hand stitching, which I don't personally possess)
1. Cut your fabric. If you're using plain ol' quilting cotton, you'll need two pieces. If you're using flannel or fleece or something thick, you'll probably only need one piece. I cut the length to be 2.5x the length of the Ziploc bag, and I added an inch to the width. The Ziploc bags are about 6" x 6.5", so I cut my fabric pieces to about 15" x 7.5". If I had it to do again, I would make the fabric even longer....maybe 18" long.

2. Sew the pieces together. If you're using flannel or fleece, you can skip this part. Place the two pieces together right sides together and pin (or, if you're lazy like me, skip the pinning). Sew together using a straight stitch and a 1/4" or 5/8" seam, leaving a 3" space unsewn for turning it right side out.

3. Clip and turn. Snip the corners and turn the piece right side out. Despite the fact that I said I *never* iron, I really would have ironed this at this point since it's a gift for a friend. Unfortunately, I was doing my sewing in the middle of the night and the ironing board and the iron were in the bedroom. So...it's wrinkly as usual! Go ahead and stitch your opening closed, too.

4. Fold into the proper position. I have very, very bad visual/spatial skills, so it took me *forever* to figure out the proper positioning! I sewed, ripped out seams, sewed, ripped out seams, sewed again. Whew! I finally figured it out, though. Fold up the bottom a little more than 6" (because the Ziploc bag is 6" tall). Fold the top flap down and toward the inside so that the top edge and the bottom edge meet. Pin it together to make sure it all stays in place. Trust me...pin it! I'm not sure my directions on the folding make sense...here are some pictures that I hope will help.


Making the Ice Pack
I found a few different techniques for making ice packs online, so I tried three different ones to see which one I liked best. In one baggie, I put just plain ol' hand soap. In another, I put a mixture of half soap and half water. In the last one, I put three parts water and one part rubbing alcohol. All in all, I like the pure soap one the best. It retains its squishy-ness after being frozen and won't make a huge mess if the bag breaks. My second favorite was the alcohol mixture. It was also quite squishy after being frozen, and it was by far the cheapest pack to make. My only reservation about it is that it may be a large mess if the bag breaks. I guess alcohol evaporates quickly and wouldn't damage most things, but I just imagine it exploding all over the living room when little ones inevitably jump on it (Not that I've ever seen little ones jump on these things. Right, Rebecca and Nancy?). The half soap/half water one is definitely my least favorite. It froze solid and did not retain it's squishy nature at all. Kim suggested putting popcorn kernels in the baggie because the moisture within the kernels will freeze, but they won't stick together (like a bag of peas would). That will definitely be my next experiment!
Anyway, making the pack was simple. Label a baggie as an Ice Pack:


I am also planning on making smaller ones using jewelry bags that are a nice size for toddler hands to hold. These are a little big for Ella to manage on her own, but I think the jewelry bags would be just perfect.
Go make a stack of these! They're quick and easy, and it's nice to see them stacked up in the freezer, ready for the next boo-boo.

*Liquid Dish or Hand Soap
*Fabric (maybe 1/4 yd or so...scraps work fine)
*Two Plastic Ziploc Bags
*Scissors
*Pins
*Sewing Machine (or a love of hand stitching, which I don't personally possess)
1. Cut your fabric. If you're using plain ol' quilting cotton, you'll need two pieces. If you're using flannel or fleece or something thick, you'll probably only need one piece. I cut the length to be 2.5x the length of the Ziploc bag, and I added an inch to the width. The Ziploc bags are about 6" x 6.5", so I cut my fabric pieces to about 15" x 7.5". If I had it to do again, I would make the fabric even longer....maybe 18" long.

2. Sew the pieces together. If you're using flannel or fleece, you can skip this part. Place the two pieces together right sides together and pin (or, if you're lazy like me, skip the pinning). Sew together using a straight stitch and a 1/4" or 5/8" seam, leaving a 3" space unsewn for turning it right side out.

3. Clip and turn. Snip the corners and turn the piece right side out. Despite the fact that I said I *never* iron, I really would have ironed this at this point since it's a gift for a friend. Unfortunately, I was doing my sewing in the middle of the night and the ironing board and the iron were in the bedroom. So...it's wrinkly as usual! Go ahead and stitch your opening closed, too.

4. Fold into the proper position. I have very, very bad visual/spatial skills, so it took me *forever* to figure out the proper positioning! I sewed, ripped out seams, sewed, ripped out seams, sewed again. Whew! I finally figured it out, though. Fold up the bottom a little more than 6" (because the Ziploc bag is 6" tall). Fold the top flap down and toward the inside so that the top edge and the bottom edge meet. Pin it together to make sure it all stays in place. Trust me...pin it! I'm not sure my directions on the folding make sense...here are some pictures that I hope will help.


5. Sew both of the sides. Make sure you leave the top edge open! Also make sure you backstitch well at the beginning and end of each line of stitching. The opening is going to take a lot of stretching and pulling over time, so you want to be sure that it's secure.

Making the Ice Pack
I found a few different techniques for making ice packs online, so I tried three different ones to see which one I liked best. In one baggie, I put just plain ol' hand soap. In another, I put a mixture of half soap and half water. In the last one, I put three parts water and one part rubbing alcohol. All in all, I like the pure soap one the best. It retains its squishy-ness after being frozen and won't make a huge mess if the bag breaks. My second favorite was the alcohol mixture. It was also quite squishy after being frozen, and it was by far the cheapest pack to make. My only reservation about it is that it may be a large mess if the bag breaks. I guess alcohol evaporates quickly and wouldn't damage most things, but I just imagine it exploding all over the living room when little ones inevitably jump on it (Not that I've ever seen little ones jump on these things. Right, Rebecca and Nancy?). The half soap/half water one is definitely my least favorite. It froze solid and did not retain it's squishy nature at all. Kim suggested putting popcorn kernels in the baggie because the moisture within the kernels will freeze, but they won't stick together (like a bag of peas would). That will definitely be my next experiment!
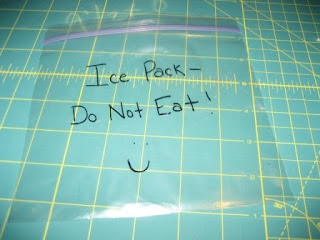
Anyway, making the pack was simple. Label a baggie as an Ice Pack:
Fill it with whatever mixture you choose, and then squeeze out all the air you can before sealing it. For whatever reason, kids seem to think these are great for jumping on, so I *strongly* urge you to double-bag it! :)
Go ahead and put the bag inside the pouch you just made and chuck it in the freezer. Keep it there until you need it! You'll be glad you have an ice pack at your fingertips the next time your little one bumps his head or smashes a finger.


I am also planning on making smaller ones using jewelry bags that are a nice size for toddler hands to hold. These are a little big for Ella to manage on her own, but I think the jewelry bags would be just perfect.
Go make a stack of these! They're quick and easy, and it's nice to see them stacked up in the freezer, ready for the next boo-boo.
Thank you for the tutorial, I'm definitely going to make some of these at some point. I'll have to add it to my to do list, haha
ReplyDeleteI neeeeed to do this too! I never have icepacks when I need them.
ReplyDeleteI am currently in the process of gathering " healing basket" items.... This one is a must...( excepte it will go in the freezer not the basket!)
ReplyDeletea great idea! I need to make some of these! Maybe W'd be less ice resistant if he had a fun pouch like these!
ReplyDeleteHey, found your blog when you outed your status. Love this ice pack idea. Immi is always asking for an ice pack because her friends have them, and we don't have any kid sized ones. The one kid pack we got burst after a few uses! I love the idea of making them yourself so, even if it does inevitably break, you know what is coming out of it and oozing onto your child.
ReplyDeleteI might even dust off my sewing machine (used once, a year ago, for testing stitches) to try this out. I bet it would be great with those little snack-sized ziplock bags, too.