Showing posts with label Amanda. Show all posts

Friday, July 23, 2010

Photo Friday

We made a brief visit to the James River at Pony Pasture Rapids this week and got a few pictures. Unfortunately, the terrain there is so uneven and slippery that I was terrified to take my camera very far beyond the shore! In these pictures, the girls are having a blast throwing rocks into the river and asking Albanie to fetch them.

throwing the rock into the river..I love how this picture makes it look like the rock is levitating above ella's hand

pointing at the rock and asking if albee will pease get it

  
albanie happily obliging the rock throwing toddlers by wading into the super-slippery, algae-covered rocks

again....not twins...

Since we're on a river theme here (and all the above pictures look very similar), I thought I'd throw in some photos from a trip to another river, the Potomac River, earlier in the summer. Such a different terrain and experience!

using a shell as a shovel...what fun!

ella admiring the water from afar

 dani is so adventurous in the water...she had no issue wading on her own

Here's to a beautiful weekend filled with adventure!

~Amanda

Tuesday, July 20, 2010

Mushroom Pocket Top

Making clothing for Ella is one of my favorite things to do; it's so rewarding to see her playing while wearing something I've put my heart into! When I spotted some gorgeous toadstool fabric at my favorite local fabric store, Quilting Adventures, I knew it was destined to become some sort of Ella apparel. I later picked up this pattern from the same store:


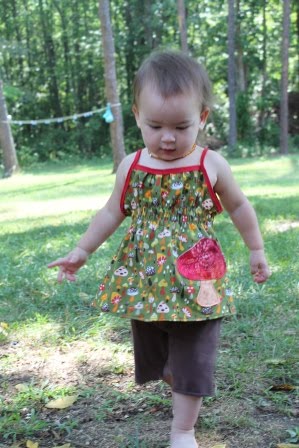
This pattern is definitely cute, but I'm not a pink and floral kind of gal. I decided to ditch the flower pocket and make an appliqued mushroom pocket instead.


The pattern was well written and very simple, but I have one major complaint: the sizing. I followed the guidelines on the pattern even though I thought a 3T sounded way too big for Ella. Even as I cut it out, I had huge reservations about the sizing. Unfortunately, I never trust myself when it comes to altering sewing patterns. I usually follow the pattern exactly (even with mistakes and/or mis-sizing) and then correct subsequent productions. Not terribly efficient, but I seriously have zero confidence in my ability to judge whether or not the finished product will turn out the way I expect. Anyway, this top turned out to be so huge on Ella that it wouldn't even stay on! I faced a multi-faceted dilemma; I could take this top apart and start over (uh...have I mentioned how lazy I am?), I could put it away and save it for when it would actually fit (I know I've mentioned my impatient nature), or I could find a way to make it work. Can you guess which path I chose?


I really, really didn't want to rip out any stitching, so I decided to add a few lines of shirring. Despite having looked at several shirred projects and tutorials online and having already purchased elastic thread specifically for that purpose, I had never actually shirred a single item. I went to my go-to sewing tutorial blog, indietutes, and followed the shirring instructions from one of her projects. As I was easily sewing along my chalk lines, my mother (who is a product of the smocking generation), giggled and said, "I wonder what lazy person came up with this idea!" I replied, "A very smart one!" She agreed.

Here is what the shirring looks like up close and personal:


If I had intended for this to be a shirred top from the beginning, there are some things I would have definitely done differently, but this worked for my purposes. It was a very quick way (maybe 5-10 minutes from marking the lines to cutting the final threads) to alter this shirt to [mostly] fit my little one! Here are a few action shots:

wandering through the yard

tasting a marigold

browsing at the library

kneading pizza dough for dinner

I should mention that the pre-teen you see in many of the pictures is my niece, Albanie, who is visiting from Indiana. She has been with us for the past 3 weeks (she tagged along with my mom), but she and Mom will be returning home at the end of this week. Ella will miss her Albee very much, I'm sure!  I'll certainly miss her, too; along with being a great kid in general, she's been a wonderful mommy's helper!  Here's she is helping with the pizza dough:

so excited when I reponded "yes!" when she asked if she could toss the dough ball into the air

really getting into the throwing of the dough

I really wish I had taken pictures of the pizza after it was finished, but it went way too fast! It was the most amazing pizza dough I have ever tried, and I plan on making it in bulk and freezing portions. It came from one of my favorite cookbooks, Vegan with a Vengeance. Here is another blog entry that lists the recipe with a few pictures. I would typically do a cheese-less pizza with veggie toppings, but I was really in the mood for junk food. I bought some Yves meatless pepperoni and Daiya mozza-style shreds. Om nom nom...that stuff is amazing! If you've tried vegan cheeses in the past and have been disappointed, you must try this! It's even soy-free!

Okay, I think I just forgot that this isn't a vegan foodie blog...I'll try to restrain myself from engaging in such tangents in the future!

~Amanda

Glue Batik Elephant

Remember how I said a couple of posts ago that I woke up full of energy and ready to create? Well, I wasn't kidding! This is yet another project I was able to complete that day.  I also said I get most of my ideas from Childhood Magic, and this is one more. I love the idea of making custom items for Ella, but the cost of buying fabric paints and all the extra supplies seemed so prohibitive. I had NO idea that you could use el-cheapo acrylic craft paint on fabrics! I went to the craft store and stocked up on primary colors, black, and white. Hey, I can make any color of the rainbow, right? Why spend more on the secondary and tertiary colors???

I didn't really do tutorial-type photos for this project, I just took a couple of pictures along the way. Check out the blog above for detailed instructions!

I bought a cute little canvas bag at the craft store for a buck or two and traced the outline of an elephant using chalk. I then covered those lines and added details using blue gel glue. I also filled in any other areas that I wanted to remain white (like the tusks).

I then painted the picture using acrylic paints (that's orange and purple you see there, folks; sorry for the lighting issues in my bathroom!). I think Ariella used watered down acrylics, but I wanted BOLD colors. I just used straight acrylics without diluting them at all.

The finished product after laundering and drying. I should probably mention that I never, ever iron. Don't be surprised by the wrinkly fabrics in all my future pictures ;-)  We took the bag on its inaugural library trip today. Ella won't carry it yet, but she insisted that I carry it everywhere for her. I think it's a success! I love, love, love the batik effect this creates, and I can imagine so many additional possibilities for this technique. Stay tuned for more!

Oh, and here's one more thing on did on this most productive day: dairy-free chocolate ice cream!


 ~Amanda

Sunday, July 18, 2010

Floating Candles and Preserving Extra Wax

After I finished making the beeswax lanterns I just blogged about, I still had a decent amount of wax left over. I didn't want to waste it, so I decided to make a few floating candles from Childhood Magic and In the Shade of the Old Oak Tree. I also made some little decorations using candy molds to preserve the rest. Ella really enjoyed helping with this!


First I took some homemade playclay and pressed it into thin pieces on an old cookie sheet. I then just barely pushed some metal cookie cutters into the playclay. This is to seal the bottom of the cookie cutters so your wax doesn't spill everywhere! I also decided to try putting in the wicks at this point, which worked great. I just barely pressed them into the playclay.


Next, I slowly poured the melted wax from my pyrex measuring cup into the cookie cutter molds. The cup is very, very hot, so be sure to use oven mitts! (See my previous post for tips on melting beeswax).

Ella really enjoyed chewing on the wicks during this process! I gave her a plate with some playclay and a couple of cookie cutters to make her own molds. She loved it!

I have some vintage candy molds passed down to me from my grandmother that I used to preserve the little bit of extra. I made little flowers (above) and...

CARE BEARS! Remember those? Notice the little discolored blob at the bottom of the bowl? That's where the first balloon from the lantern project burst and the water went into the cup of wax. I tried to avoid pouring it until the very last couple of molds, which worked just fine. Just be aware that whatever molds you pour the water into will not turn out properly; you'll just end up with some random chips of wax (which was fine with me because I was doing this to just preserve the wax until I remelt it and use it for another project).

It takes a bit for the wax to harden completely, and I was too nervous to move them into the freezer before they had set up. After they were fairly solid, though, I transferred them to the freezer and they hardened FAST! Removing them from the molds was super easy, too; just push them out and peel off the playclay! I only had difficulty removing one of the floral pieces, and that was resolved by running it under a little bit of warm water. It popped right out!

Here is a sampling of the candles and random pieces. The wicks in the circles are off center because I actually used a biscuit cutter (which has a handle that displaces the wick) and didn't think to cut the wick and place it properly before pouring the wax. Oh, well!

I put a candle and some of the flower pieces on the nature table along with the new beeswax lantern. I love it!

~Amanda

Beeswax Lantern

I woke up this morning full of energy and ready to create! I find so much inspiration from my very favorite blog, Childhood Magic. I've been collecting supplies for several projects from that blog, and I started many of them today. First, and the one I was most excited about, was the beeswax lantern. Before Ella woke up this morning, I went on a nature walk on my own and collected some lovely leaves and flowers. I pressed the flowers between sheets of paper towels in large books; I really should have pressed them longer, but I'm very impatient! Here is my photo journal (a light tutorial, I guess) of the process:

1. Chop beeswax into chunks. Hitting your fancy Henckels chef knife with a hammer does wonders.


2. Place said chunks into the nice pyrex measuring cup that your grandmother left you when she passed. This will make your mother really happy.

  
3. Melt the wax in a homemade double boiler. Pretend to be careful by using a thermometer, but ignore whatever temperature it reads.

  
4. Fill a water balloon with water and some air. Or, if you can't find a water balloon in your local store, use whatever balloons you can find. Act surprised when it pops the first time you dip it in wax. Then start over using TWO balloons (I used a chopstick to help insert one balloon inside the other).

  
5. Dip the balloon into the hot wax quickly and remove. Let harden for just a second, then dip again. Repeat this process about 20 times. If you are adding flowers and/or leaves to your lantern, dip them in the wax first and then gently (and carefully) press them onto the lantern form. Dip into wax at least a couple more times to seal them in.

  
6. Get your 12-year-old niece to pop the balloon over a pan using a pin.

  
7. Again, act surprised when the balloon explodes and water spills all over your lovely coffee table, stack of library books, and fancy TV remote. Pretend you don't know why the remote doesn't work when your husband gets home.

  
8. I forgot to get a picture of the next step, but it adds a really nice finishing touch if you press the bottom and top of the lantern against a warm pan to smooth the rough edges and make it stand without wobbling.

9. Place a tea light or small votive inside the lantern and enjoy the warm glow!

~Amanda
 

Wednesday, July 7, 2010

My Peace

Since Kim got the ball rolling, I guess it's my turn to introduce myself and my family. Although my husband and I embody an eclectic mix of perspectives and beliefs, we completely agree on what we want for our daughter. We both came from very loving families, but the settings were completely different! He grew up in the Big City while I grew up in the Spacious Country.  My parenting has been very much influenced that place, and I think I can pinpoint the two biggest contributors: nature and peace.

I was born and raised on a small working farm. We raised corn, cattle, pigs, chickens, and rabbits along with our own family vegetable garden. My family's ideal day included working in the gardens, hanging laundry on the clothesline, sipping coffee on the front porch, and falling asleep to the sound of crickets chirping outside our windows. My mother and I could go weeks during the summer without leaving the house to venture into town. My father had a passion for gardening, and I vividly remember the pure joy I felt while digging my hands into the earth to plant seeds that would later turn into sweet corn on the cob or juicy watermelon. I was always very aware of where our food came from; most of the vegetables came from our gardens and the meat came from our animals. It wasn't until much later in life that I discovered where most people's food comes from. It was at that point that I became a devoted vegetarian, and I haven't looked back since!

I married a city boy, though, and the first several years of our marriage was spent living in apartments and the suburbs. We went through several houses in the first 7 years trying to find the right fit. We finally settled into a small-ish country property about 25 minutes from town. There are days we hate the drive, of course, but most days are pure bliss. I find such joy sitting on my back patio drinking coffee or tea...it's so reminiscent of my childhood! I remember feeling very disconnected from nature in our former residences. My mom mailed me a package of tomato plants from my dad's greenhouse the first year I was married, but I had no place to put them. We had a balcony at our apartment, but it was completely shaded. I remember crying when I realized I wouldn't get a single tomato from those plants!

Fast forward to my life now with my beautiful daughter, Ella...perfection. My history with nature and my passion for peace guide each and every day with her. I want her to treasure the moments she spends running around outdoors naked and digging her hands in the dirt. I want her to feel the peace that surrounds her as she listens to the birds chirp and the corn grow. I want her to feel free, truly free from the confines of society and free to explore the world around her as she chooses. I want to see the joy in her eyes when she takes the first bite of a watermelon that she planted on her own. More than anything, I want her to know that her life is her own and she can decide exactly what to do with it.


 ~Amanda