Showing posts with label fabric. Show all posts

Wednesday, July 21, 2010

The Ragamuffin Witch/Fairy Skirt - Now with photos!

Edit - Now with pics! 

On a recent trip to the Children's Museum of Richmond the girls came across these amazing dress up props.  They were a sheer stretchy nylon fabric with 2 layers split in opposite places...which made them very versatile as playthings!  They made great skirts when worn around the waist and equally wonderful "jackets" when worn around the arms in a backpack-ish fashion.  They had an amazing time running around...behind the curtain and out the sides in surprising ways.  They looked very much like a pair of raggedy witchlings!  It was adorable!

Because they both enjoyed them so much I decided that I had to make my own version...as usual!  The problem was finding the fabric....and then actually SEWING it.

Yeah...they really aren't twins...

Choosing Fabric

It's a good call to go with a knit on this project so you don't have to worry about it raveling...a big part of their charm is the little runs and tears that appear through use so you kinda want it to go a little nuts and ragged on the edges.  Any knit would work...even old t-shirts could be Frankensteined into a skirt...but the closest thing I could find to the fabric of the originals was "athletic mesh".  I found it at Joann's for $10 a yard...and of course I forgot my coupon.  Doh!  No clue what it's used for.  Perhaps for skating outfits or something?  Anyway...the one downside is it is a bitch in a half to sew!  Seriously....next time I may go with a normal cotton knit just to avoid sewing on the mesh.

Although...please note that I am LAZY.  I don't like changing needles, thread, or presser feet...so I probably could have avoided all the trouble by looking at my manual and changing some stuff around!  Don't be lazy and cause yourself headaches like I do....just a word of advice!  Ha!

The Ragamuffin Witch/Fairy Dress-Up Skirt Written Tutorial

You will need:

1 and 1/4 yards of fabric that does NOT ravel
Elastic for the waist
~~~

1) Cut your fabric piece into 4ths.

2) Pin 2 pieces together and sew 5 inches down the short sides to for a tube.  Do this with the other 2 pieces as well.

3) Put the 2 tubes into one another so the seams are at 4 separate points.

4) Fold over both layers to make a casing that will accommodate the size of your elastic.

5) Thread elastic through the casing in an appropriate length for your child's waist.

6) Close the casing and you're done!

If you wish, you can use 2 different pieces of fabric for a multicolored skirt...or even 4 or more pieces for something really wild!


 ~~~

Dani wasn't having anything to do with trying this thing on tonight...but I will update with pictures as soon as I have them!


I got pictures!  FINALLY!

She is wearing a turquoise mesh playskirt (which is slightly too big in the waist so I tied it up with a kool-aid dyed playsilk), a funky star/moon skirt from some old fabric that used to hang in my doorway as a teen, and a knitted calorimetry.

What a happy girl. <3

-Kim

Tuesday, July 20, 2010

Mushroom Pocket Top

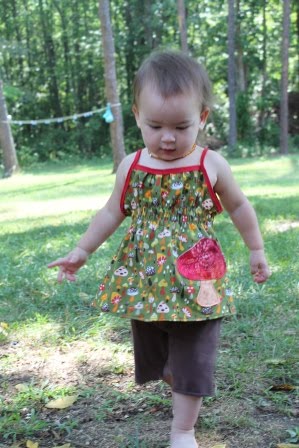
Making clothing for Ella is one of my favorite things to do; it's so rewarding to see her playing while wearing something I've put my heart into! When I spotted some gorgeous toadstool fabric at my favorite local fabric store, Quilting Adventures, I knew it was destined to become some sort of Ella apparel. I later picked up this pattern from the same store:


This pattern is definitely cute, but I'm not a pink and floral kind of gal. I decided to ditch the flower pocket and make an appliqued mushroom pocket instead.


The pattern was well written and very simple, but I have one major complaint: the sizing. I followed the guidelines on the pattern even though I thought a 3T sounded way too big for Ella. Even as I cut it out, I had huge reservations about the sizing. Unfortunately, I never trust myself when it comes to altering sewing patterns. I usually follow the pattern exactly (even with mistakes and/or mis-sizing) and then correct subsequent productions. Not terribly efficient, but I seriously have zero confidence in my ability to judge whether or not the finished product will turn out the way I expect. Anyway, this top turned out to be so huge on Ella that it wouldn't even stay on! I faced a multi-faceted dilemma; I could take this top apart and start over (uh...have I mentioned how lazy I am?), I could put it away and save it for when it would actually fit (I know I've mentioned my impatient nature), or I could find a way to make it work. Can you guess which path I chose?


I really, really didn't want to rip out any stitching, so I decided to add a few lines of shirring. Despite having looked at several shirred projects and tutorials online and having already purchased elastic thread specifically for that purpose, I had never actually shirred a single item. I went to my go-to sewing tutorial blog, indietutes, and followed the shirring instructions from one of her projects. As I was easily sewing along my chalk lines, my mother (who is a product of the smocking generation), giggled and said, "I wonder what lazy person came up with this idea!" I replied, "A very smart one!" She agreed.

Here is what the shirring looks like up close and personal:


If I had intended for this to be a shirred top from the beginning, there are some things I would have definitely done differently, but this worked for my purposes. It was a very quick way (maybe 5-10 minutes from marking the lines to cutting the final threads) to alter this shirt to [mostly] fit my little one! Here are a few action shots:

wandering through the yard

tasting a marigold

browsing at the library

kneading pizza dough for dinner

I should mention that the pre-teen you see in many of the pictures is my niece, Albanie, who is visiting from Indiana. She has been with us for the past 3 weeks (she tagged along with my mom), but she and Mom will be returning home at the end of this week. Ella will miss her Albee very much, I'm sure!  I'll certainly miss her, too; along with being a great kid in general, she's been a wonderful mommy's helper!  Here's she is helping with the pizza dough:

so excited when I reponded "yes!" when she asked if she could toss the dough ball into the air

really getting into the throwing of the dough

I really wish I had taken pictures of the pizza after it was finished, but it went way too fast! It was the most amazing pizza dough I have ever tried, and I plan on making it in bulk and freezing portions. It came from one of my favorite cookbooks, Vegan with a Vengeance. Here is another blog entry that lists the recipe with a few pictures. I would typically do a cheese-less pizza with veggie toppings, but I was really in the mood for junk food. I bought some Yves meatless pepperoni and Daiya mozza-style shreds. Om nom nom...that stuff is amazing! If you've tried vegan cheeses in the past and have been disappointed, you must try this! It's even soy-free!

Okay, I think I just forgot that this isn't a vegan foodie blog...I'll try to restrain myself from engaging in such tangents in the future!

~Amanda

Glue Batik Elephant

Remember how I said a couple of posts ago that I woke up full of energy and ready to create? Well, I wasn't kidding! This is yet another project I was able to complete that day.  I also said I get most of my ideas from Childhood Magic, and this is one more. I love the idea of making custom items for Ella, but the cost of buying fabric paints and all the extra supplies seemed so prohibitive. I had NO idea that you could use el-cheapo acrylic craft paint on fabrics! I went to the craft store and stocked up on primary colors, black, and white. Hey, I can make any color of the rainbow, right? Why spend more on the secondary and tertiary colors???

I didn't really do tutorial-type photos for this project, I just took a couple of pictures along the way. Check out the blog above for detailed instructions!

I bought a cute little canvas bag at the craft store for a buck or two and traced the outline of an elephant using chalk. I then covered those lines and added details using blue gel glue. I also filled in any other areas that I wanted to remain white (like the tusks).

I then painted the picture using acrylic paints (that's orange and purple you see there, folks; sorry for the lighting issues in my bathroom!). I think Ariella used watered down acrylics, but I wanted BOLD colors. I just used straight acrylics without diluting them at all.

The finished product after laundering and drying. I should probably mention that I never, ever iron. Don't be surprised by the wrinkly fabrics in all my future pictures ;-)  We took the bag on its inaugural library trip today. Ella won't carry it yet, but she insisted that I carry it everywhere for her. I think it's a success! I love, love, love the batik effect this creates, and I can imagine so many additional possibilities for this technique. Stay tuned for more!

Oh, and here's one more thing on did on this most productive day: dairy-free chocolate ice cream!


 ~Amanda