Sunday, August 15, 2010

Flower Child

On a recent trip to the Potomac River, Dani got to see a swan.  It got pretty close too, which rocked!  Honestly, I'm not to fond of swans myself...they are MEAN.  Don't mess with them, they will attack you...and those suckers are BIG!
Dani enjoyed the wind in her hair.  She loves the boat...but not having to wear a lifejacket!  
My favorite part of the day was spent in my mother's flower garden.  It's a large circle in their sideyard full of roses, purple cone flowers, daisies, herbs, etc.  My mother has a greenhouse and gardening is one of her few remaining hobbies. 
Dani picked several bouquets of flowers!  She is now obsessed with flowers...she brought them in the car with us on the way home and plucked most of the petals.
I need to find my flower press...or make another one!  (a tutorial to make perhaps???)


At home we had a frozen limeade cup.  What a lovely day!

Monday, August 2, 2010

A Quiet Week

It's looking to be a quiet week here on Not Twins. Amanda is doing a 3-day potty learning program with Ella which requires they go hermit for the duration (from what I hear via text, so far so good!)....and I am without a working camera (due to another bout of the dread "lens-error"). I also fail at being particularly creative at the moment. Boo! Hiss! Dani, however, is creative as ever. I snapped a rather poor-quality photo with my Droid while she was enthralled with a bit of marker-carnage. I looked away for a moment only to find she has given herself dual half-sleeves. My budding tattoo artist perhaps? It looked like fun, so I joined her.

This weekend the Children's Museum of Richmond had a poorly advertised "breastfeeding celebration" in honor of World Breastfeeding Week. Sadly I didn't have Dani's "I LIKE TO NURSE" shirt ready in time for it...but she still had a wonderful time playing outside in the waterplay area. I also got a new hospital mug out of it...which I was THRILLED with.
I'm quite thrilled with the outcome of the glue batik process...mind you this is the second attempt on a shirt that has been sitting almost-done for over a month! The first time it came out way too light and was difficult to read.

And just another random shot of my little hippie-child. <3

Friday, July 30, 2010

Boo-Boo Pouch Tutorial

My very good friend's little boy had a major accident at the children's museum recently that required 7 (!) stitches right between his eyes. She stayed home from work the next day to be with him, so I got the rare opportunity to hang out with my dear WOHM during the day! I decided to head over to their house, but I didn't want to go empty-handed. Even though it was a little late for this particular accident, I made him a boo-boo pouch (aka mini-ice pack with cover). I took lots of pictures along the way so that I could make a proper tutorial for you all! So without further ado, the Boo-Boo Pouch Tutorial!

Boo-Boo Pouch Tutorial


Materials:


*Liquid Dish or Hand Soap
*Fabric (maybe 1/4 yd or so...scraps work fine)
*Two Plastic Ziploc Bags
*Scissors
*Pins
*Sewing Machine (or a love of hand stitching, which I don't personally possess)

1. Cut your fabric. If you're using plain ol' quilting cotton, you'll need two pieces. If you're using flannel or fleece or something thick, you'll probably only need one piece. I cut the length to be 2.5x the length of the Ziploc bag, and I added an inch to the width. The Ziploc bags are about 6" x 6.5", so I cut my fabric pieces to about 15" x 7.5". If I had it to do again, I would make the fabric even longer....maybe 18" long.


2. Sew the pieces together. If you're using flannel or fleece, you can skip this part. Place the two pieces together right sides together and pin (or, if you're lazy like me, skip the pinning). Sew together using a straight stitch and a 1/4" or 5/8" seam, leaving a 3" space unsewn for turning it right side out.


3. Clip and turn. Snip the corners and turn the piece right side out. Despite the fact that I said I *never* iron, I really would have ironed this at this point since it's a gift for a friend. Unfortunately, I was doing my sewing in the middle of the night and the ironing board and the iron were in the bedroom. So...it's wrinkly as usual! Go ahead and stitch your opening closed, too.


4. Fold into the proper position. I have very, very bad visual/spatial skills, so it took me *forever* to figure out the proper positioning! I sewed, ripped out seams, sewed, ripped out seams, sewed again. Whew! I finally figured it out, though. Fold up the bottom a little more than 6" (because the Ziploc bag is 6" tall). Fold the top flap down and toward the inside so that the top edge and the bottom edge meet. Pin it together to make sure it all stays in place. Trust me...pin it! I'm not sure my directions on the folding make sense...here are some pictures that I hope will help.


5. Sew both of the sides. Make sure you leave the top edge open! Also make sure you backstitch well at the beginning and end of each line of stitching. The opening is going to take a lot of stretching and pulling over time, so you want to be sure that it's secure.


Making the Ice Pack

I found a few different techniques for making ice packs online, so I tried three different ones to see which one I liked best. In one baggie, I put just plain ol' hand soap. In another, I put a mixture of half soap and half water. In the last one, I put three parts water and one part rubbing alcohol. All in all, I like the pure soap one the best. It retains its squishy-ness after being frozen and won't make a huge mess if the bag breaks. My second favorite was the alcohol mixture. It was also quite squishy after being frozen, and it was by far the cheapest pack to make. My only reservation about it is that it may be a large mess if the bag breaks. I guess alcohol evaporates quickly and wouldn't damage most things, but I just imagine it exploding all over the living room when little ones inevitably jump on it (Not that I've ever seen little ones jump on these things. Right, Rebecca and Nancy?). The half soap/half water one is definitely my least favorite. It froze solid and did not retain it's squishy nature at all. Kim suggested putting popcorn kernels in the baggie because the moisture within the kernels will freeze, but they won't stick together (like a bag of peas would). That will definitely be my next experiment!

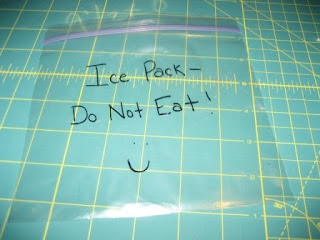
Anyway, making the pack was simple. Label a baggie as an Ice Pack:


Fill it with whatever mixture you choose, and then squeeze out all the air you can before sealing it.  For whatever reason, kids seem to think these are great for jumping on, so I *strongly* urge you to double-bag it! :)

Go ahead and put the bag inside the pouch you just made and chuck it in the freezer. Keep it there until you need it! You'll be glad you have an ice pack at your fingertips the next time your little one bumps his head or smashes a finger. 


I am also planning on making smaller ones using jewelry bags that are a nice size for toddler hands to hold. These are a little big for Ella to manage on her own, but I think the jewelry bags would be just perfect.

Go make a stack of these! They're quick and easy, and it's nice to see them stacked up in the freezer, ready for the next boo-boo.

Thursday, July 29, 2010

Magical Playsilks

There's nothing quite like a line full of playsilks blowing in the breeze.  Silks have to be one of the most versatile playthings in our homes!  They become blankets, skirts, scarves, capes, the walls of a fort, an ocean, a meadow, or simply something to play peekaboo with.

Buying silks predyed can be a bit pricey, but dying your own is cheap, easy, and a lot of fun!

Undyed silk scarves can be purchased cheaply from Dharma Trading and can be dyed easily using Kool-Aid or food coloring, hot water, and some vinegar.


The Process

First we soaked the silks in bowls of hot water and vinegar.

 In a separate pan we mixed warm/hot water, vinegar, and 8 packets of Koolaid (for 2 regular sized silks and 3 or 4 hankie sized silks).

Pretty swirls...it reminds me of the planet Neptune...

Now add the silks...

Stir and squish it around till the silk is evenly saturated with color.

Let the silks soak in the dye for 2 minutes.  You'll know they're done when the liquid loses most of its color and takes on a milky appearance.

In the case of purple it did NOT lose much color...so we eyeballed it.

Rinse the silks in cold water to remove any excess dye.  This was a good step to involve the kids in...

...at least till they lose interest!  We finished up the rest.

Meanwhile, Dani and Ella decided to do some finger painting in the yard.  Gotta love the country!

Dani was her own canvas.

Hanging them out to dry

Aren't they lovely!

It was a nice breezy day...perfect for photos!

Now for some play...

Monday, July 26, 2010

An Unschooling Moment


 Today we met my mother for lunch.  It was in the afternoon which meant a completely dead Pizza Hut in a small town.  Dani is a pizza fanatic right now!  It's one of the words we now have to spell out in front of her or else she runs around yelling "Pee-See!  Pee-See!" and looking for it.  "Stroller", "naked", and "shower" also have to be spelled out for similar reasons.


After lunch we stopped by the Dollar General.  Dani enjoyed hiding in the racks while Mom and I looked around.  We made our purchases and headed outside....


Where I saw THIS:

You can see Dani's reflection in the glass...

WOW!  It was huge!  Maybe 6 inches wide and looked so much like a fall leaf...

My mother's words were "this is a homeschool moment!....well....I guess it's an unschooling moment too."

Yes, Mom.  Haha!  Can you tell she isn't fond of the term?

I tried to get a photo of Dani with it...but that didn't really work when I was holding her...

It's times likes this I wish Dani was older....at not-quite-2 she doesn't exactly get what she's looking at here.  It didn't move so I imagine she was wondering "what is mama so excited about???" 

If she were a bit older, or if I'd had my hands free, I would have whipped out ye olde Droid and looked up what sort of amazing moth this was.  It has this furry yellow body!  I wondered what it felt like...but I didn't want to hurt it.

Nature is everywhere!  Even at the Dollar General!

-Kim

Process Art

If you are the parent of a toddler, you *must* acquire a copy of the book First Art: Art Experiences for Toddlers and Twos. The idea behind this book is that children of this age group learn more from the process of working with various media as opposed to focusing on a finished product. Here's an excerpt from page 10 of the book, under a section labeled "It's the Process, Not the Product."

     Toddlers and twos explore art as a learning experience or an experiment, discovering what is stimulating and interesting.  They are more interested in doing art rather than making a finished product. During the process, toddlers and twos discover their own independence, as well as the mystery of combinations, the joy of exploration, the delight of creating, and the frustration of challenges--all important pieces in the puzzle of learning.  Whatever the finished product--whether it is a bright, sticky glob or a gallery-worthy masterpiece--to a toddler or two-year-old, it is only the result of "doing art," not the reason for doing art.

This book has been thumbed through so much and stained so thoroughly in our home (as a result of mixing paint, of course!); it is an extremely well-loved piece of our library.  It has also become the basis of a regular play date that Kim and I host at my house about every month or so. We are both members of a local attachment parenting group and extend an open invitation to all the parents of toddlers and twos each month to participate in these play dates. They have each been HUGE successes!

We held another one of these events last week, and I'd like to post some pictures I snapped while the kids were engaged. This particular play date consisted of three processes from the book: sit-down dance painting, squeeze painting, and working with playclay.

 
the result of "sit-down dance painting," which actually became marching painting, handpainting, and stand-up dance painting

Ella was *very* focused on the squeeze painting...she kept returning it to it over and over again

J.J. especially loved poking at the playclay...the little piles were covered in his fingerprints by the end

Having the play dates at my house makes it difficult for a lot of the members to come.  After all, we do live about 30 minutes from anyone else in the group! My house does, however, have many advantages, including a massive private yard that invites children to run around bare-bottomed and chickens that loved to be held and pet!

this was Adele's first time visiting our house, so it was all new to her! she is looking at a silkie named Minerva that we are chicken-sitting for a friend

We also have a large brick patio in the backyard, so the sidewalk chalk is available during every play date. Ella never pays any attention to the chalk when we're home alone, but she really gets excited about it when she sees other children drawing.

 
such a funny little pose 

 
the art girls

 
a bit of mama art

Just in case I wasn't clear before, I highly recommend this book! It is completely worth the ten buck investment if for nothing besides the huge selection of paint recipes. Even though it is a bit of work to plan and set up these play dates, I find them so rewarding and pleasurable. The kids always leave happy (and messy), and the mamas always leave with smiles and a promise to make the trek again the next month.

~Amanda